
Coco ChanElf - almost 'finished' :)
Page 2 of 5 •  1, 2, 3, 4, 5
 ![]()
Re: Coco ChanElf - almost 'finished' :)
![]() Big_Al_Smith Sun Dec 11, 2011 12:34 am
Big_Al_Smith Sun Dec 11, 2011 12:34 am
Coco_ChanElf wrote:I think it was 250 inc postage to Ireland. Since I was quoted 900 by another crowd, I consider this a bargain. Plus the two gentlemen at Chapman and Cliff are a delight to deal with, so pleasant and interesting. I would use them again in a heartbeat.
to my mind, that's pretty good - it looks great. "Rusty"'s (he's really a wolseley but won't show it!) Elf dash was french-polished by a professional (the boyfriend of Mum's reflexologist and my masseuse) for £125 at "mate's rates" and is not as good as yours

Big_Al_Smith- Posts : 1226
Points : 6881
Join date : 2008-11-02
Age : 58
Location : Chislehurst - -

Coco ChanElf - ongoing works
![]() robinkritz1 Thu Dec 22, 2011 2:07 am
robinkritz1 Thu Dec 22, 2011 2:07 am

robinkritz1- Posts : 124
Points : 5354
Join date : 2010-01-09
Dash
![]() evlin64 Thu Dec 22, 2011 4:19 pm
evlin64 Thu Dec 22, 2011 4:19 pm
I have also had my dash restored by Chapman & Cliff great job and a pleasure to deal with I had the whole dash venered and the wood handels changed to chrome knobs as MG dash.
I have tryed to host a pic but do not think it has uploaded!!!
[img]
 [/img]
evlin64- Posts : 85
Points : 5713
Join date : 2008-12-29
Location : Cumbria

Coco_ChanElf- Posts : 282
Points : 4949
Join date : 2011-09-11
Age : 52
Location : Dunboyne, Republic of Ireland.
humph- Posts : 237
Points : 5106
Join date : 2011-02-08
Age : 49
Location : Liverpool
Re: Coco ChanElf - almost 'finished' :)
![]() superworm Fri Dec 23, 2011 1:02 am
superworm Fri Dec 23, 2011 1:02 am
I used Millboard from Woolies Trim::
http://www.woolies-trim.co.uk/c-146-millboard.aspx
It has an embossed side like a leather effect (as per original Elf)...t'other side is matt black cardboard finish.
Problem was that it came via mail in a roll 1.55 metres by 1.24 metres and it finished up as a curved sheet....took a bit of straightening!
Price and quality are good though - maybe you could simply ask them to cut the sheet in half and send it in a flat pack??? (01778 347347)
Hope this helps.
btw, Spoke to Chapman & Cliff at the recent Classic Car Show - they are indeed a grand pair of lads and certainly not "Rip-Off" merchants
like some I've encountered! Their presentation of Dashes, etc was fantastic/
Cheers
Alan

superworm- Posts : 176
Points : 5749
Join date : 2009-02-14
Location : Fylde, Lancashire
Re: Coco ChanElf - almost 'finished' :)
![]() Red Riley Fri Dec 23, 2011 2:31 am
Red Riley Fri Dec 23, 2011 2:31 am

Red Riley- Admin
- Posts : 1239
Points : 6958
Join date : 2008-10-27
Age : 64
Location : Johns Island, SC, USA
Overriders, headlining, WHEELS!
![]() Coco_ChanElf Thu Mar 08, 2012 9:19 pm
Coco_ChanElf Thu Mar 08, 2012 9:19 pm
4 hen's teeth (overriders! I'm so happy I could dance!)
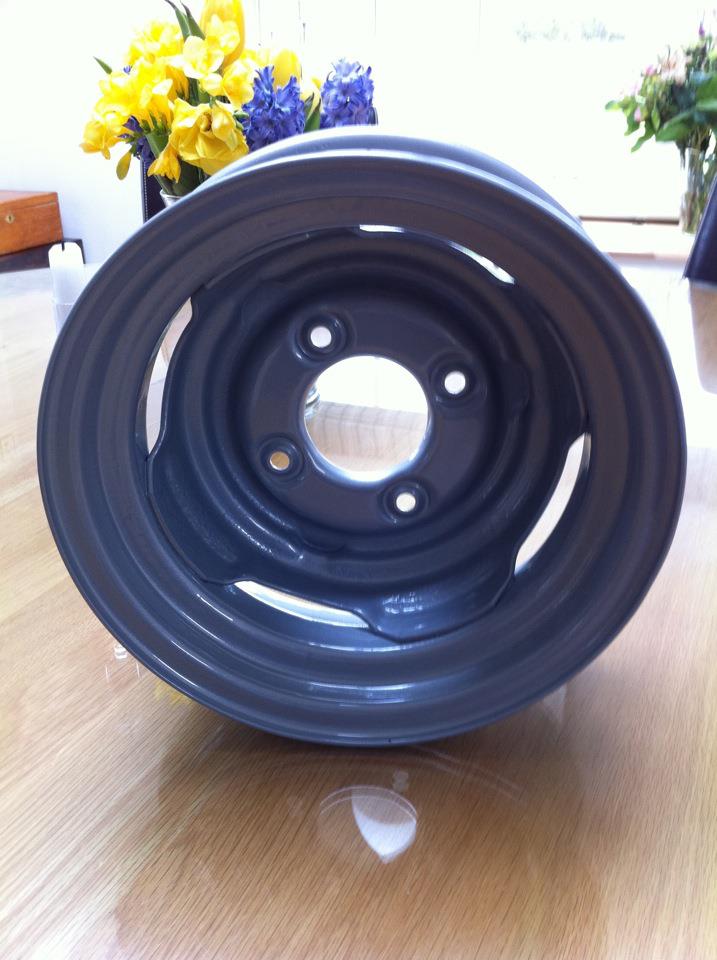
5 sandblasted and silver painted original wheels
a lovely headlining.
Pics below!
Now I just need to find someone in Ireland who can professionally fit a headlining. Even the instructions are complicated!
Can't wait for the better weather to arrive, I've so much good stuff to go on Coco that I've been collecting over the winter. She's going to look magnificent! *grinning*.


Coco_ChanElf- Posts : 282
Points : 4949
Join date : 2011-09-11
Age : 52
Location : Dunboyne, Republic of Ireland.
Re: Coco ChanElf - almost 'finished' :)
![]() TONYELF Fri Mar 09, 2012 3:07 am
TONYELF Fri Mar 09, 2012 3:07 am
As for the headlining, well, you look young enough to be able to crawl around in your Elf to do this but if you search for upholsterers in your area someone must do car seats should be able to help or recommend another?

TONYELF- Admin
- Posts : 1743
Points : 7452
Join date : 2008-11-21
Location : Chester UK
Re: Coco ChanElf - almost 'finished' :)
![]() humph Fri Mar 09, 2012 12:10 pm
humph Fri Mar 09, 2012 12:10 pm
1) Don't suppose you have a template for the glove boxes you made do you?
2) If you're going back to steels, what's happening with the minilites that were on the car?
humph- Posts : 237
Points : 5106
Join date : 2011-02-08
Age : 49
Location : Liverpool
Humph
![]() Coco_ChanElf Sat Mar 10, 2012 12:39 am
Coco_ChanElf Sat Mar 10, 2012 12:39 am
Coco_ChanElf- Posts : 282
Points : 4949
Join date : 2011-09-11
Age : 52
Location : Dunboyne, Republic of Ireland.
TonyElf
![]() Coco_ChanElf Sat Mar 10, 2012 12:42 am
Coco_ChanElf Sat Mar 10, 2012 12:42 am
Coco_ChanElf- Posts : 282
Points : 4949
Join date : 2011-09-11
Age : 52
Location : Dunboyne, Republic of Ireland.
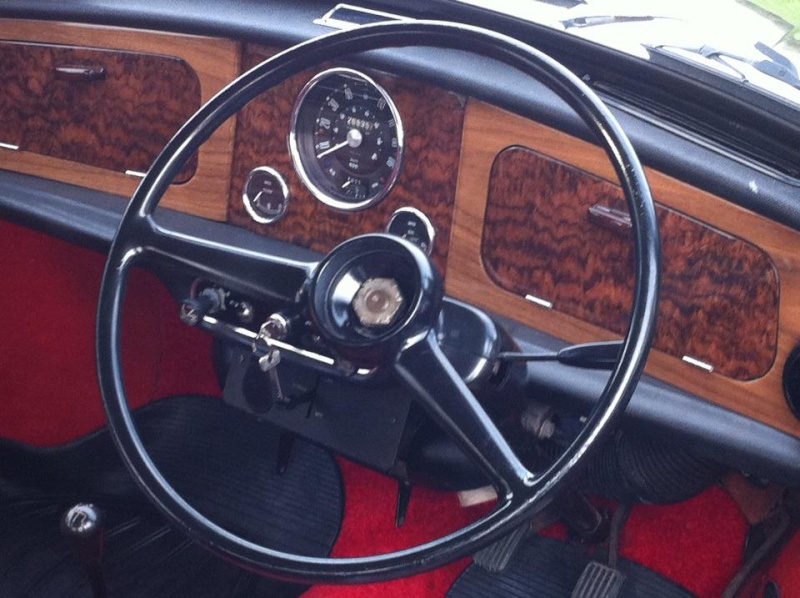
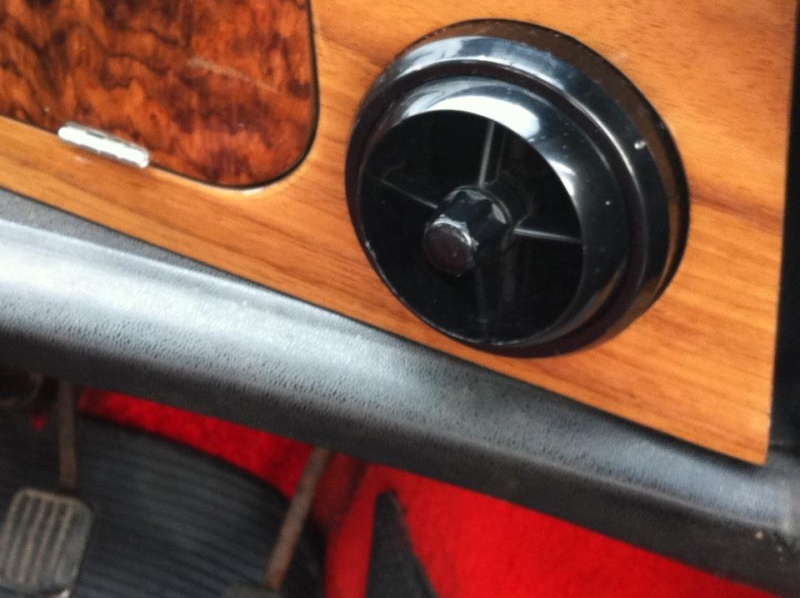
Dashboard, gloveboxes, steering cowl
![]() Coco_ChanElf Sun Mar 11, 2012 9:32 pm
Coco_ChanElf Sun Mar 11, 2012 9:32 pm
Next I trimmed down and installed my two home made gloveboxes. Either side of them we pushed in bits of sound proofing material. They look pretty good and are tough as old boots so hopefully they will last.
Finally, we refitted the dashboard, and it looks fabulous. The photos don't really do it justice because it's so shiny it's hard to get a good snap.
Anyway, very pleased with our afternoon's work!


 [img][/img]
Coco_ChanElf- Posts : 282
Points : 4949
Join date : 2011-09-11
Age : 52
Location : Dunboyne, Republic of Ireland.
Re: Coco ChanElf - almost 'finished' :)
![]() TONYELF Sun Mar 11, 2012 11:44 pm
TONYELF Sun Mar 11, 2012 11:44 pm
Is it possible to fit them through the dash board holes????
Last edited by TONYELF on Sun Mar 11, 2012 11:46 pm; edited 1 time in total (Reason for editing : last question added)
TONYELF- Admin
- Posts : 1743
Points : 7452
Join date : 2008-11-21
Location : Chester UK
Glovebox
![]() Coco_ChanElf Mon Mar 12, 2012 12:16 am
Coco_ChanElf Mon Mar 12, 2012 12:16 am
I must admit, it's like a black hole inside, not that it matters too much because all that's likely to be in there is a vintage first aid kit and a fancy pair of gloves!
If I'd used the flimsier original Millboard I think if would have been possible to do keyhole surgery on the gloveboxes, however the Millboard I chose was so thick and hard there's no chance you could bend it sufficiently to get it in through the glovebox door.
Coco_ChanElf- Posts : 282
Points : 4949
Join date : 2011-09-11
Age : 52
Location : Dunboyne, Republic of Ireland.
Re: Coco ChanElf - almost 'finished' :)
![]() TONYELF Mon Mar 12, 2012 12:37 am
TONYELF Mon Mar 12, 2012 12:37 am
TONYELF- Admin
- Posts : 1743
Points : 7452
Join date : 2008-11-21
Location : Chester UK
Templates
![]() Coco_ChanElf Mon Mar 12, 2012 3:33 am
Coco_ChanElf Mon Mar 12, 2012 3:33 am
Coco_ChanElf- Posts : 282
Points : 4949
Join date : 2011-09-11
Age : 52
Location : Dunboyne, Republic of Ireland.
Steering Wheel, grille badges, vent ducts, stickers!
![]() Coco_ChanElf Sat Mar 24, 2012 11:07 pm
Coco_ChanElf Sat Mar 24, 2012 11:07 pm
Got the new steering wheel fitted. Now we just need the centre badge, but it already looks 100 times better than the Cooper wheel that was in Coco when we bought her.
We removed the dash and fitted new vent ducting that I got from Somerford Mini. Fresh air vents now blowing up a storm.
Finally got the EHR grille badge fitted.
Got my Riley Owners Club, Irish Mini Owners Club, Dunboyne Motor Club and Chanel logo stickers on. Be a miracle if I can see out the windows!
Laid the damp carpets out to dry in the sun. Endless deliberation took place re. new colour scheme for carpets and upholstery.
Oh, and I got the overriders fitted! By the time I got round to taking the photos, I'd forgotten about that. Expect there'll be some pics of them soon, any road.
Exhausted!


Coco_ChanElf- Posts : 282
Points : 4949
Join date : 2011-09-11
Age : 52
Location : Dunboyne, Republic of Ireland.
TONYELF- Admin
- Posts : 1743
Points : 7452
Join date : 2008-11-21
Location : Chester UK
Cheers Tony.
![]() Coco_ChanElf Sun Mar 25, 2012 10:08 am
Coco_ChanElf Sun Mar 25, 2012 10:08 am
Coco_ChanElf- Posts : 282
Points : 4949
Join date : 2011-09-11
Age : 52
Location : Dunboyne, Republic of Ireland.
Re: Coco ChanElf - almost 'finished' :)
![]() TONYELF Sun Mar 25, 2012 12:22 pm
TONYELF Sun Mar 25, 2012 12:22 pm
!
Keep going!
TONYELF- Admin
- Posts : 1743
Points : 7452
Join date : 2008-11-21
Location : Chester UK
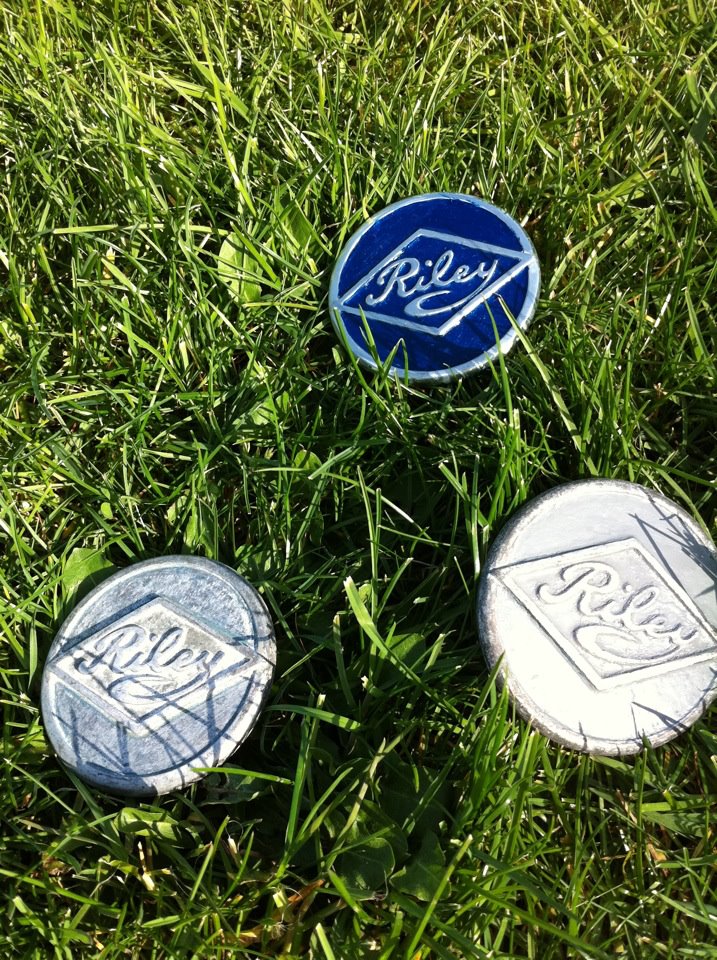
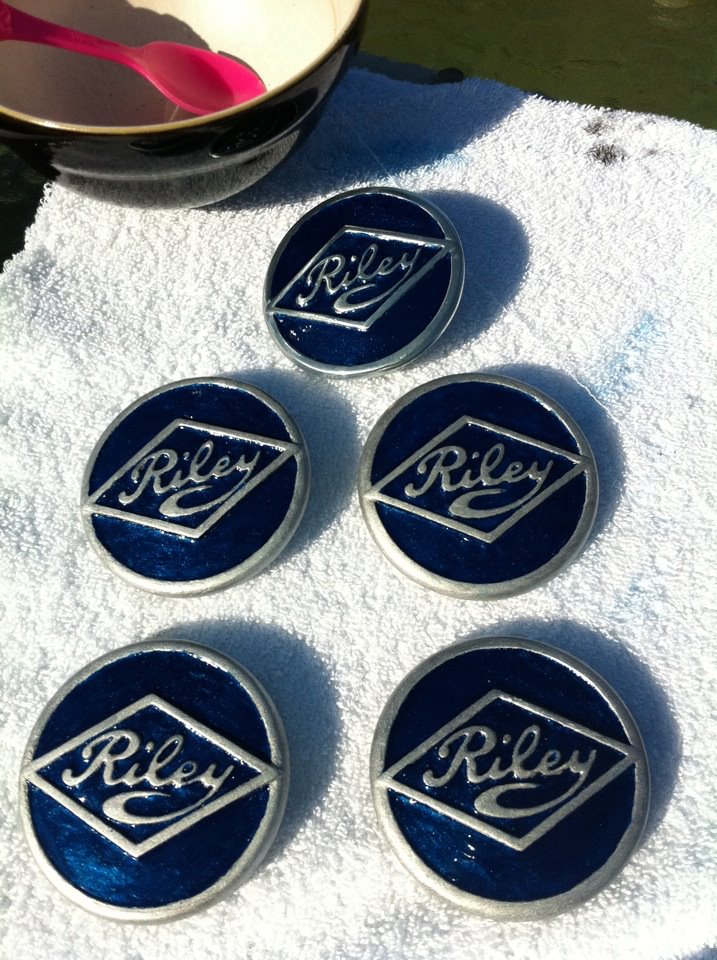
Hub Cap Bosses
![]() Coco_ChanElf Sun Mar 25, 2012 9:44 pm
Coco_ChanElf Sun Mar 25, 2012 9:44 pm
The photo shows one sanded back, one primed, and one painted.
Actually, the painted one was a bit of a cheat, it's one that I got from Ebay that was already painted but I didn't like the colour, it was matt off blue, so that didn't need any prep.
The other four came from an EHR member in NZ as part of a bunch of parts I bought from him when he was breaking an Elf.
But I digress. I sanded them down using an acrylic nail battery operated dremel tool attachment, a little waisted cyclinder shape. It was dead handy for getting into all the crannies around the Riley text.
Next, I have painted them all with the primer. I can recommend the Halfords scratch kits for this because they are in a pen format, with a really fine nozzle, and when you screw off the top there is also a fine brush like a signwriters brush, which is just the job. They include the primer, the paint, also a tiny fine sanding block and a tiny fibreglass brush, all of which are perfect tools for this horrendously aggravating job!
Still, at least I got to sit in the sun and do it today.
Coco_ChanElf- Posts : 282
Points : 4949
Join date : 2011-09-11
Age : 52
Location : Dunboyne, Republic of Ireland.
Hub cap bosses cont'd.!
![]() Coco_ChanElf Wed Mar 28, 2012 1:21 am
Coco_ChanElf Wed Mar 28, 2012 1:21 am
Once that had all dried, I painted all the primed areas with the blue. Then waited again for it all to dry. Then did another coat, and now it's waiting 24 hours before being finished with the clear sealing coat...
Now I know what people mean when they say 'it's like watching paint dry!'

Coco_ChanElf- Posts : 282
Points : 4949
Join date : 2011-09-11
Age : 52
Location : Dunboyne, Republic of Ireland.
Re: Coco ChanElf - almost 'finished' :)
![]() Big_Al_Smith Wed Mar 28, 2012 11:17 pm
Big_Al_Smith Wed Mar 28, 2012 11:17 pm
Big_Al_Smith- Posts : 1226
Points : 6881
Join date : 2008-11-02
Age : 58
Location : Chislehurst - -
Re: Coco ChanElf - almost 'finished' :)
![]() Johnnypoopoopants Fri Mar 30, 2012 10:56 pm
Johnnypoopoopants Fri Mar 30, 2012 10:56 pm
Johnnypoopoopants- Posts : 111
Points : 5247
Join date : 2010-04-18
Location : Norfolk
Page 2 of 5 • 1, 2, 3, 4, 5 ![]()
» Almost finished
» 1968 ELF MK3
» Engine almost finished! Not the bloody body though!
» Irish Built 1967 Riley Elf for sale
|
|
|