
Coco ChanElf - almost 'finished' :)
Page 1 of 5 • 1, 2, 3, 4, 5 ![]()

Coco ChanElf - almost 'finished' :)
![]() Coco_ChanElf Sun Oct 09, 2011 8:58 pm
Coco_ChanElf Sun Oct 09, 2011 8:58 pm
So, this weekend has been pretty busy!
Yesterday, we disassembled her dashboard ready to send off to Chapman and Cliff who are going to relacquer and/or re-veneer.
Whilst we had that out, we started to replace dash bulbs. We appear to have shorted the entire shebang now, so that may require more work...!
She got her new nose badge, thanks to a lovely EHR member who helped me out!

Today, she got her demister bevels sanded and repainted with flat satin black hammerite. That will need sanding back again and another coat tomorrow I expect.

She got her fresh air vents cleaned up and the metal parts likewise sanded and painted with hammerite to kill the rusty bits.
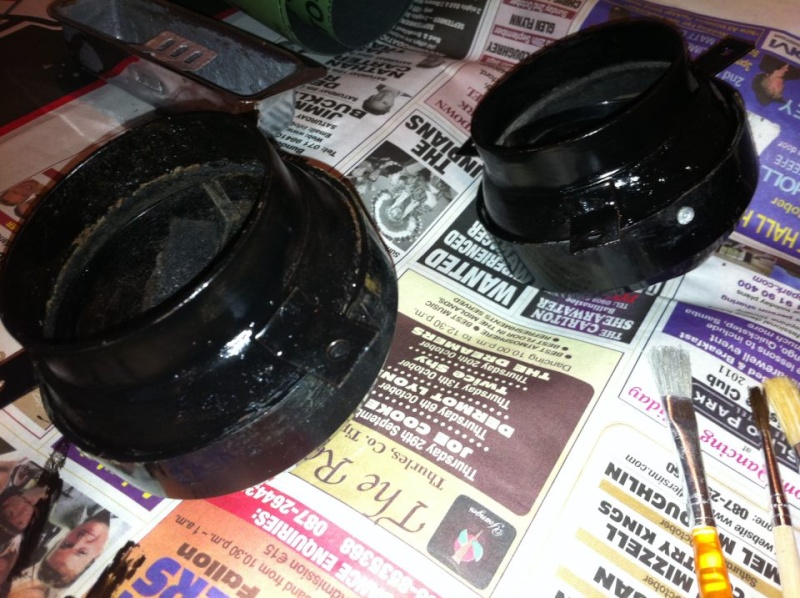
The vent pipes had some VILE old stuff shoved down them, like old football socks or dishrags. Got those out!

I polished up her ashtray, removed all the internal rust and painted the inside with hammerite silver.
We removed her interior light, which had been painted with brown gloss, and I removed all that and got it cleaned up a treat. We have a new bulb at the ready, let's hope it works!

Same with the rear view mirror, which after removing what looked like 30 years of grime, only needs a new sucker to be as good as new.

Oh, and I took apart her tail lights, cleaned them all up, and reassembled with new gaskets that I got from ebay.

(Edit - finally got round to replacing those thumbnails with bigger photos, for no other reason than that I am eventually going to use this as a record of what I did to Coco, it'll be handy).
Last edited by Coco_ChanElf on Sat Aug 04, 2012 11:16 am; edited 3 times in total

Coco_ChanElf- Posts : 282
Points : 4959
Join date : 2011-09-11
Age : 52
Location : Dunboyne, Republic of Ireland.
Re: Coco ChanElf - almost 'finished' :)
![]() Red Riley Sun Oct 09, 2011 10:30 pm
Red Riley Sun Oct 09, 2011 10:30 pm
Not being nitt-picky, okay maybe a little bit. Just want to help you out with the pics. When you upload the images to the ServImg thingy, you get three choices to copy, the Thumbnail, the Image and the Image URL. The one you want for the forum is the last one. Here's the devil, which as you say is in the details: The first two options post the pic as a link back to the ServImg site, so you have to click to see the full image. The last one, the Image URL, when posted on the forum, simply places the full image on the page, so no extra clicking needed. Here's a visual:
Thumbnail [img]
 [/img]
The car is looking super, by the way!
Last edited by Red Riley on Sun Oct 16, 2011 8:45 pm; edited 1 time in total

Red Riley- Admin
- Posts : 1239
Points : 6968
Join date : 2008-10-27
Age : 64
Location : Johns Island, SC, USA
Thanks!
![]() Coco_ChanElf Sun Oct 09, 2011 10:41 pm
Coco_ChanElf Sun Oct 09, 2011 10:41 pm
Coco_ChanElf- Posts : 282
Points : 4959
Join date : 2011-09-11
Age : 52
Location : Dunboyne, Republic of Ireland.
Re: Coco ChanElf - almost 'finished' :)
![]() Red Riley Sun Oct 09, 2011 10:44 pm
Red Riley Sun Oct 09, 2011 10:44 pm
I suspect I speak for most of us here when I say, We like pictures!
Red Riley- Admin
- Posts : 1239
Points : 6968
Join date : 2008-10-27
Age : 64
Location : Johns Island, SC, USA
Temporary Dashboard
![]() Coco_ChanElf Tue Oct 11, 2011 5:35 pm
Coco_ChanElf Tue Oct 11, 2011 5:35 pm
My 3 year old daughter helped.

I sanded the demister bevels down and gave them a second coat and they came up not half bad. They aren't perfect, but they are much better than they were. Ruined my nails though, I tell you!

Coco_ChanElf- Posts : 282
Points : 4959
Join date : 2011-09-11
Age : 52
Location : Dunboyne, Republic of Ireland.
Re: Coco ChanElf - almost 'finished' :)
![]() Nick Tue Oct 11, 2011 5:38 pm
Nick Tue Oct 11, 2011 5:38 pm
Nick- Posts : 92
Points : 4964
Join date : 2011-01-05
There may be a crossover!
![]() Coco_ChanElf Tue Oct 11, 2011 5:52 pm
Coco_ChanElf Tue Oct 11, 2011 5:52 pm
Nick wrote:Looking good! ( give up on nail care with classic cars!) lol..
Ah, you say that, but...I had an idea the other day, whilst I was having my nails done. She applies this stuff like a clear goo, and then sets it under a UV lamp. It's great because the result is rock hard and transparent, and then gets sanded down with a dremel tool. (What we do for beauty!) Anyway, the reason I am telling you this, is that it occurred to me it might be a way to repair little chips out of enamel badges.
Myself and the nail technician are going to do some experiments and I will report back.
Coco_ChanElf- Posts : 282
Points : 4959
Join date : 2011-09-11
Age : 52
Location : Dunboyne, Republic of Ireland.
Re: Coco ChanElf - almost 'finished' :)
![]() TONYELF Tue Oct 11, 2011 8:29 pm
TONYELF Tue Oct 11, 2011 8:29 pm

TONYELF- Admin
- Posts : 1743
Points : 7462
Join date : 2008-11-21
Location : Chester UK
Hm.
![]() Coco_ChanElf Tue Oct 11, 2011 9:25 pm
Coco_ChanElf Tue Oct 11, 2011 9:25 pm
https://www.youtube.com/watch?v=wmDSjf22ndQ
It makes your nails so strong they are brilliant tools. Since I type (a lot) they are really useful for me.
Coco_ChanElf- Posts : 282
Points : 4959
Join date : 2011-09-11
Age : 52
Location : Dunboyne, Republic of Ireland.
Normal programming now resumes.
![]() Coco_ChanElf Tue Oct 11, 2011 9:27 pm
Coco_ChanElf Tue Oct 11, 2011 9:27 pm
Coco_ChanElf- Posts : 282
Points : 4959
Join date : 2011-09-11
Age : 52
Location : Dunboyne, Republic of Ireland.
ongoing works
![]() robinkritz1 Sun Oct 16, 2011 11:11 am
robinkritz1 Sun Oct 16, 2011 11:11 am
Last edited by robinkritz1 on Mon Oct 17, 2011 2:12 am; edited 1 time in total

robinkritz1- Posts : 124
Points : 5364
Join date : 2010-01-09
Re: Coco ChanElf - almost 'finished' :)
![]() elfgirl Sun Oct 16, 2011 10:49 pm
elfgirl Sun Oct 16, 2011 10:49 pm
Coco_ChanElf wrote:Now, quick, everyone talk about cars and stuff before they revoke my membership!!
Ah but please keep chucking in the odd post about nails and pics of your dashboard decorated by your small child - it makes life so much more fun

elfgirl- Posts : 374
Points : 5980
Join date : 2008-10-27
Location : London
Gear gaiter!
![]() Coco_ChanElf Mon Oct 31, 2011 10:00 am
Coco_ChanElf Mon Oct 31, 2011 10:00 am
Last week we got our brand new (old style!) reg plates for Ireland. The paperwork was a bit of a nuisance but now Coco is officially an Irish citizen!
The demister vent bevels are back in and look good. I got a new suction pad for the rear view mirror and refitted the whole thing, that looks great now.
Next we removed the melted old gear stick gaiter. I sanded and painted the little metal retaining plate, cut a new piece of polyurethane to go between that and the carpet. I bought a gear stick gaiter from ebay identical to the one I removed, instead of replacing it with the original because we just didn't want to drill more holes and it looks ok (maybe I even prefer it, I can't decide!). Anyway, it looks grand, such a small thing and it's made a big difference.
Whilst the dashboard is out I removed the padded dash liner and the card of one glove box. I am not sure whether I will make new glove boxes myself and line them with self adhesive velour or something, or buy the cards new if they are available and recover them. Any pointers on the correct padded dash liner / glove box cards appreciated. I was looking on Newton and Somerford websites yesterday and nothing looked exactly similar. I am handy with a craft knife but always glad to look at the proper solution!
Coco_ChanElf- Posts : 282
Points : 4959
Join date : 2011-09-11
Age : 52
Location : Dunboyne, Republic of Ireland.
Gear gaiter!
![]() robinkritz1 Mon Oct 31, 2011 10:34 am
robinkritz1 Mon Oct 31, 2011 10:34 am
robinkritz1- Posts : 124
Points : 5364
Join date : 2010-01-09
Re: Coco ChanElf - almost 'finished' :)
![]() humph Mon Oct 31, 2011 11:45 am
humph Mon Oct 31, 2011 11:45 am
Coco_ChanElf wrote:Whilst the dashboard is out I removed the padded dash liner and the card of one glove box. I am not sure whether I will make new glove boxes myself and line them with self adhesive velour or something, or buy the cards new if they are available and recover them. Any pointers on the correct padded dash liner / glove box cards appreciated. I was looking on Newton and Somerford websites yesterday and nothing looked exactly similar. I am handy with a craft knife but always glad to look at the proper solution!
I have a custom consoles glove box liner ready to go into our Sidewalk, but this doesn't fit the Elf it's too large. What I plan on doing is making a scaled down version, but I can't place what material they've used to make it, it's like a dense fibre board, maybe even plastic.
humph- Posts : 237
Points : 5116
Join date : 2011-02-08
Age : 49
Location : Liverpool
Interesting
![]() Coco_ChanElf Mon Oct 31, 2011 12:22 pm
Coco_ChanElf Mon Oct 31, 2011 12:22 pm
If I can find something similar I could use the one I have as a template, and I am happy to share the template if anyone else needs it. I assume the missing one is the same but in reverse (might be wrong!)
Coco_ChanElf- Posts : 282
Points : 4959
Join date : 2011-09-11
Age : 52
Location : Dunboyne, Republic of Ireland.
Humph
![]() Coco_ChanElf Mon Oct 31, 2011 12:46 pm
Coco_ChanElf Mon Oct 31, 2011 12:46 pm
http://www.gbcarparts.com/proddetail.asp?prod=CC%2DGBLiner
I was thinking if I could get some sort of heavy card board, of lining it with something like this stuff:
http://www.brimarc.com/products/Crushed-Velvet-Roll-463017.htm
Coco_ChanElf- Posts : 282
Points : 4959
Join date : 2011-09-11
Age : 52
Location : Dunboyne, Republic of Ireland.
Dash / glovebox etc
![]() Coco_ChanElf Mon Oct 31, 2011 7:32 pm
Coco_ChanElf Mon Oct 31, 2011 7:32 pm
Dash is being reveneered by Chapman and Cliff, that should be on it's way back in the next week or so.
Meanwhile I have ordered soundproofing material (acoustic absorption foam) from www.soundinsulation.ie
That will go in the spaces.
I an going to make the new glove boxes myself using the existing card as a template. I found an amazing company that sell bookbinding supplies, they sell 3mm Millboard and black Arbetex leather cloth in morocco grain by the sheet. One sheet of each will be sufficient to do 2 if not 4 glove boxes, and the whole lot cost just over £20. Exc p&p. Www.hewit.com
I ordered a regular dashboard liner from Newton commercial for the 'floor' of the dash.
I guess we will embark on this odyssey the first weekend after the dash wood comes home so I will take loads of pics of the glove box assembly on case anyone else can benefit from it.
Coco_ChanElf- Posts : 282
Points : 4959
Join date : 2011-09-11
Age : 52
Location : Dunboyne, Republic of Ireland.
Re: Coco ChanElf - almost 'finished' :)
![]() Big_Al_Smith Mon Oct 31, 2011 7:56 pm
Big_Al_Smith Mon Oct 31, 2011 7:56 pm

Big_Al_Smith- Posts : 1226
Points : 6891
Join date : 2008-11-02
Age : 58
Location : Chislehurst - -

Re: Coco ChanElf - almost 'finished' :)
![]() humph Tue Nov 01, 2011 1:15 pm
humph Tue Nov 01, 2011 1:15 pm
Coco_ChanElf wrote:Is this the sort of thing you got?
http://www.gbcarparts.com/proddetail.asp?prod=CC%2DGBLiner
That is the exact one I have. It's an ideal template, but like I say I'm not sure what the 'card' material is ais it deosn't seem like card to me. I'm reluctant to use card of hardboard that may deteriorate with damp, after all the car is in an unheated lockup most of it's time (just paranoid I think).
humph- Posts : 237
Points : 5116
Join date : 2011-02-08
Age : 49
Location : Liverpool
Existing card glovebox lining
![]() Coco_ChanElf Wed Nov 02, 2011 5:33 pm
Coco_ChanElf Wed Nov 02, 2011 5:33 pm
Laying flattened:

Close up to see the grain.

Here it is standing up as though in place:

Obviously this one has warped over the years, so your concerns about damp are not entirely unfounded. (But if mine lasts even a fraction of the 50 years this one did, I will be pleased!)
Coco_ChanElf- Posts : 282
Points : 4959
Join date : 2011-09-11
Age : 52
Location : Dunboyne, Republic of Ireland.
Coco's Dashboard from Chapman & Cliff
![]() Coco_ChanElf Sat Dec 10, 2011 10:29 am
Coco_ChanElf Sat Dec 10, 2011 10:29 am


Coco_ChanElf- Posts : 282
Points : 4959
Join date : 2011-09-11
Age : 52
Location : Dunboyne, Republic of Ireland.
Re: Coco ChanElf - almost 'finished' :)
![]() Big_Al_Smith Sat Dec 10, 2011 12:29 pm
Big_Al_Smith Sat Dec 10, 2011 12:29 pm
Big_Al_Smith- Posts : 1226
Points : 6891
Join date : 2008-11-02
Age : 58
Location : Chislehurst - -
Re: Coco ChanElf - almost 'finished' :)
![]() paulsminis Sat Dec 10, 2011 8:02 pm
paulsminis Sat Dec 10, 2011 8:02 pm
Paul

paulsminis- Posts : 101
Points : 5090
Join date : 2010-09-16
Location : Dayton, Ohio, USA area
The damage
![]() Coco_ChanElf Sat Dec 10, 2011 8:47 pm
Coco_ChanElf Sat Dec 10, 2011 8:47 pm
Coco_ChanElf- Posts : 282
Points : 4959
Join date : 2011-09-11
Age : 52
Location : Dunboyne, Republic of Ireland.
Page 1 of 5 • 1, 2, 3, 4, 5 ![]()
» Almost finished
» 1968 ELF MK3
» Engine almost finished! Not the bloody body though!
» Irish Built 1967 Riley Elf for sale
|
|
|