
The Front Panel repair Epic 1
5 posters
Page 1 of 1

The Front Panel repair Epic 1
![]() robinkritz1 Sat Apr 03, 2010 5:05 pm
robinkritz1 Sat Apr 03, 2010 5:05 pm
Ok, Here we go. I have had to take this process into my own hands as my welder has advised that it will be beneficial for me to try and tackle as much of this process as possible to reduce the labour costs. I have a new Mini front panel and second hand Riley panel which I have to prep for the welder so that all he does is weld them together. [img] [/img]
I have had a look at Catmint's web page for the conversion process and it looks quite straight forward but I only have one chance to get it right otherwise I'm screwed. Anyone with good advise on this or are there guys out there with archives of pictures for similar conversions just to give me the confidence to do this? Also got a pretty good deal for a secondhand door from Kent check this out.[img] [/img][img][img]https://i.servimg.com/u/f69/14/79/42/65/01610.jpg[img][url=https://servimg.com/view/14794265/99][img]https://i.servimg.com/u/f69/14/79/42/65/01611.jpg[/img[img][url=https://servimg.com/view/14794265/101]
 [/img][img]
 [/img]
[/img]I have had a look at Catmint's web page for the conversion process and it looks quite straight forward but I only have one chance to get it right otherwise I'm screwed. Anyone with good advise on this or are there guys out there with archives of pictures for similar conversions just to give me the confidence to do this? Also got a pretty good deal for a secondhand door from Kent check this out.[img]
[/img][img][img]https://i.servimg.com/u/f69/14/79/42/65/01610.jpg[img][url=https://servimg.com/view/14794265/99][img]https://i.servimg.com/u/f69/14/79/42/65/01611.jpg[/img[img][url=https://servimg.com/view/14794265/101][/img][img][/img]Last edited by robinkritz1 on Sat Apr 03, 2010 5:09 pm; edited 1 time in total (Reason for editing : Blurred picture)

robinkritz1- Posts : 124
Points : 5354
Join date : 2010-01-09
Re: The Front Panel repair Epic 1
![]() asahartz Sun Apr 04, 2010 12:42 pm
asahartz Sun Apr 04, 2010 12:42 pm
There's some pictures on my website that are relevant. I didn't do it quite the same way but it may help with the indicator conversion.

asahartz- Posts : 415
Points : 5946
Join date : 2009-03-03
Age : 62
Location : Mansfield, Notts
Re: The Front Panel repair Epic 1
![]() robinkritz1 Sun Apr 11, 2010 1:45 am
robinkritz1 Sun Apr 11, 2010 1:45 am
Hey Asahartz, I took a look at your front panel resto, its quite different than what I had in mind however it was still usefull. I went ahead and started carving out the second hand panel to see how we are going to merge the two. Here is what it looks like now.[img]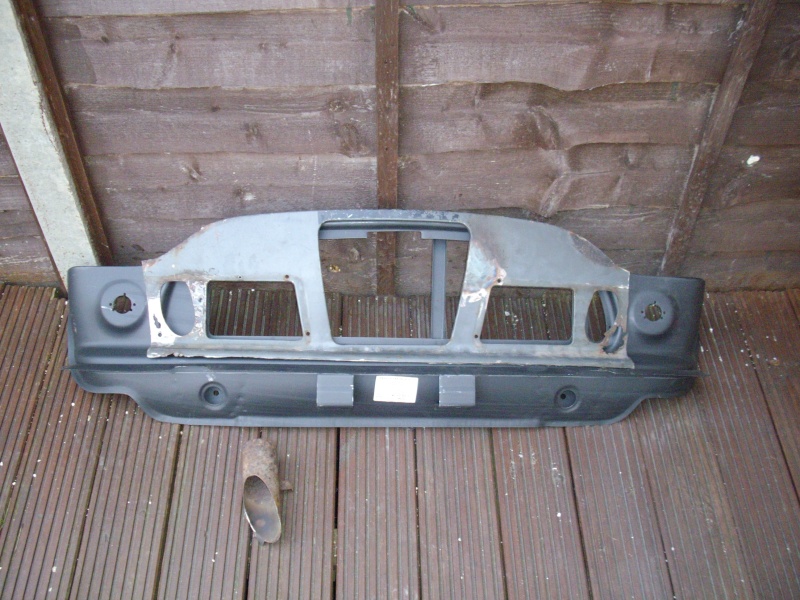 [/img]
Do the parts dealers do this air intake pipe?
[img] [/img]
[/img]Do the parts dealers do this air intake pipe?
[img]
[/img]
robinkritz1- Posts : 124
Points : 5354
Join date : 2010-01-09
Re: The Front Panel repair Epic 1
![]() Red Riley Sun Apr 11, 2010 6:04 am
Red Riley Sun Apr 11, 2010 6:04 am
Take another look at the catmint site. Gordon sells them.robinkritz1 wrote:
Do the parts dealers do this air intake pipe?

Red Riley- Admin
- Posts : 1239
Points : 6958
Join date : 2008-10-27
Age : 64
Location : Johns Island, SC, USA
Re: The Front Panel repair Epic 1
![]() superworm Mon Apr 12, 2010 12:19 am
superworm Mon Apr 12, 2010 12:19 am
Hi
Yesterday I changed Elfie's Oil and FILTER (Millers Mini oil!!!!).
When I converted a Mini front panel to Elf spec using a similar process to Catmint's, I unfortunately left that vertical stiffener which is just off centre in place. I now find its a pain in the a*se when changing the filter.....needs one hand through the hole - t'other from underneath and I'm too old for that!!!!!! ...its coming off next time the engine is removed.
So - after you have welded/brazed in the new closing panel and before you fit the assembly to your car, cut the stiffener off (not before as you may lose the correct shape of the panel). The stiffener is to support the slam panel in way of the bonnet latch/catch and is not needed on the Elf/Hornet as the new piece of front panel provides adequate support.
BTW, I didn't weld in the extra piece in to the mini front panel - I silver-soldered it...got no distortion

superworm- Posts : 176
Points : 5749
Join date : 2009-02-14
Location : Fylde, Lancashire
Re: The Front Panel repair Epic 1
![]() robinkritz1 Mon Apr 12, 2010 12:27 am
robinkritz1 Mon Apr 12, 2010 12:27 am
Ah! thanks for that piece of advise, I had a feeling that new panel would provide support but I thought I would leave it in for extra measure, so off with it.Hey, what do you mean by silver soldered it? Is it the same as lead loading?
robinkritz1- Posts : 124
Points : 5354
Join date : 2010-01-09
Re: The Front Panel repair Epic 1
![]() asahartz Mon Apr 12, 2010 1:24 pm
asahartz Mon Apr 12, 2010 1:24 pm
Red Riley wrote:Take another look at the catmint site. Gordon sells them.robinkritz1 wrote:
Do the parts dealers do this air intake pipe?
And I wish they'd been around when I did mine! I made my own, and it was a PITA.
asahartz- Posts : 415
Points : 5946
Join date : 2009-03-03
Age : 62
Location : Mansfield, Notts
Re: The Front Panel repair Epic 1
![]() asahartz Mon Apr 12, 2010 1:31 pm
asahartz Mon Apr 12, 2010 1:31 pm
robinkritz1 wrote:Ah! thanks for that piece of advise, I had a feeling that new panel would provide support but I thought I would leave it in for extra measure, so off with it.Hey, what do you mean by silver soldered it? Is it the same as lead loading?
Silver soldering is like ordinary soldering, except using a silver-based solder rather than the usual lead-based. Because silver has a higher melting point it's harder and stronger than lead solder. I would guess to make it work properly you would need to clean the metals thoroughly and ensure that the mating surfaces are perfectly flat (or matching curves at least). Cleaning all the black paint off the new panel is good practice anyway; it's a poor paint applied for protection only and will tend to flake away. The longest part of prepping the front panel for my Mini Sky was cleaning off the black stuff!
asahartz- Posts : 415
Points : 5946
Join date : 2009-03-03
Age : 62
Location : Mansfield, Notts
Re: The Front Panel repair Epic 1
![]() robinkritz1 Mon Apr 12, 2010 7:39 pm
robinkritz1 Mon Apr 12, 2010 7:39 pm
Wow that sounds like just what Id like to do to mine. Ill research the silver soldering and hope use that method. What would be a good heat source for this to work properly? I already have 2x propane gas bottles on standby. I would like to perform this operation on my roof also. Any more information on this process would be much appreciated.
robinkritz1- Posts : 124
Points : 5354
Join date : 2010-01-09
Re: The Front Panel repair Epic 1
![]() TONYELF Mon Apr 12, 2010 9:48 pm
TONYELF Mon Apr 12, 2010 9:48 pm
asahartz wrote:robinkritz1 wrote:Ah! thanks for that piece of advise, I had a feeling that new panel would provide support but I thought I would leave it in for extra measure, so off with it.Hey, what do you mean by silver soldered it? Is it the same as lead loading?
Silver soldering is like ordinary soldering, except using a silver-based solder rather than the usual lead-based. Because silver has a higher melting point it's harder and stronger than lead solder. I would guess to make it work properly you would need to clean the metals thoroughly and ensure that the mating surfaces are perfectly flat (or matching curves at least). Cleaning all the black paint off the new panel is good practice anyway; it's a poor paint applied for protection only and will tend to flake away. The longest part of prepping the front panel for my Mini Sky was cleaning off the black stuff!
How did you do it? I have a Heritage floor and extension panel and it's a bugger to get the black paint off them!

TONYELF- Admin
- Posts : 1743
Points : 7452
Join date : 2008-11-21
Location : Chester UK
Re: The Front Panel repair Epic 1
![]() asahartz Mon Apr 12, 2010 10:14 pm
asahartz Mon Apr 12, 2010 10:14 pm
My main weapon for removing the black paint is a wire twist brush on an angle grinder. On awkward curves I sometimes resort to a blowlamp to burn it off.
However on some panels you might find a rather better quality finish, kind of satin, which may be labelled "electrophoretic". That's safe to leave, being harder and having better adhesion - my pattern wings were coated with this stuff. I just take a grinding disc to the edges that will take a weld. However I can see the front panel that Robinkritz has is painted with the matt black rubbish like mine was.
However on some panels you might find a rather better quality finish, kind of satin, which may be labelled "electrophoretic". That's safe to leave, being harder and having better adhesion - my pattern wings were coated with this stuff. I just take a grinding disc to the edges that will take a weld. However I can see the front panel that Robinkritz has is painted with the matt black rubbish like mine was.
asahartz- Posts : 415
Points : 5946
Join date : 2009-03-03
Age : 62
Location : Mansfield, Notts
Re: The Front Panel repair Epic 1
![]() superworm Tue Apr 13, 2010 12:31 am
superworm Tue Apr 13, 2010 12:31 am
Silver soldering does indeed, like regular soldering, need the to be joined surfaces to be spotlessly clean. It also needs an appropriate flux which is a white powder to be mixed with a small quantity of water (*and a dash of "fairy liquid") to form a thickish paste about the consistency of treacle.
Silversoldering is almost as strong as regular brazing and, similarly, is not that good for butt joints (won't be any when making up an Elf/Hornet front panel anyways!). Maybe don't use this method on large expanses of unsupprted flat plates else you'll get distortion - just like continuous welding.
A good tip is to use correction fluid ("snopake" etc) on the parts of the panel you don't want the solder to run to.
Your propane torch should be ok - metal needs to be about cherry red and the silver solder will "flash" to wherever there's flux - I laid little strips of the silver solder along the joint (say 1/2" strips at 1" pitch). You should also clean off any residual flux as best you can after the joint has cooled - wire brush at least....if you use Asahartz' suggestion of the twistbrush in your angle grinder, make sure you have safety goggles on .... they spit frangments of the wire brush as well as the crud you're trying to shift
The best UK supplier is at ::
http://www.cupalloys.co.uk/
...use the "model engineering" company for your supplies (1mm rod and "Easyflo" flux powder). There's plenty of "HowTo's" on this site also.
not sure where our colonial cousins will get their supplies but it shouldn't be too difficult as its pretty common stuff...have a look through:
http://www.modelengineeringsoc.com/Supplies/sup-tools.html
Cheers
superworm- Posts : 176
Points : 5749
Join date : 2009-02-14
Location : Fylde, Lancashire
Re: The Front Panel repair Epic 1
![]() robinkritz1 Tue Apr 13, 2010 12:41 am
robinkritz1 Tue Apr 13, 2010 12:41 am
Thank you for those tips, I've saved the sites on my favourites, I like these old methods of repair they are in keeping with the style of car. I will keep you updated on my progress.
robinkritz1- Posts : 124
Points : 5354
Join date : 2010-01-09
Page 1 of 1
Permissions in this forum:
You cannot reply to topics in this forum|
|
|