
Hydrolastic, keep repairing or change to dry cone?

Hydrolastic, keep repairing or change to dry cone?
![]() MGs Sat Oct 08, 2011 3:38 pm
MGs Sat Oct 08, 2011 3:38 pm
With the lack of availability of hydrolastic parts, is it worth swapping to dry cone? As far as I can tell this means new sub frames front and rear and new suspension all round. Has anyone done this and got a rough guide to the cost and time involved?
Cheers
Car sat on some bricks in the garage at the moment

MGs- Posts : 99
Points : 5045
Join date : 2010-11-23
Re: Hydrolastic, keep repairing or change to dry cone?
![]() Nick Sat Oct 08, 2011 7:26 pm
Nick Sat Oct 08, 2011 7:26 pm
Nick- Posts : 92
Points : 4946
Join date : 2011-01-05
Hydrolastic, keep repairing or change to dry cone?
![]() MGs Sun Oct 09, 2011 3:29 pm
MGs Sun Oct 09, 2011 3:29 pm
MGs- Posts : 99
Points : 5045
Join date : 2010-11-23
Re: Hydrolastic, keep repairing or change to dry cone?
![]() Red Riley Sun Oct 09, 2011 4:43 pm
Red Riley Sun Oct 09, 2011 4:43 pm
Hydro to dry conversion
Don't know if any of the UK suppliers offer a kit already made up like this one.

Red Riley- Admin
- Posts : 1239
Points : 6950
Join date : 2008-10-27
Age : 64
Location : Johns Island, SC, USA
Hydrolastic, keep repairing or change to dry cone?
![]() MGs Sun Oct 09, 2011 4:59 pm
MGs Sun Oct 09, 2011 4:59 pm
MGs- Posts : 99
Points : 5045
Join date : 2010-11-23
Re: Hydrolastic, keep repairing or change to dry cone?
![]() Red Riley Sun Oct 09, 2011 7:35 pm
Red Riley Sun Oct 09, 2011 7:35 pm
Red Riley- Admin
- Posts : 1239
Points : 6950
Join date : 2008-10-27
Age : 64
Location : Johns Island, SC, USA
Re: Hydrolastic, keep repairing or change to dry cone?
![]() cheleker Sun Oct 09, 2011 8:32 pm
cheleker Sun Oct 09, 2011 8:32 pm
If the leak in the bag is at the hose connection to the bag, it should be repairable.
The coil springs (not my favorites) will fit in both front and rear wet subframes without modification. You can keep the better leveraged wet upper arms, but you will have to drill them out to accept the lower shock mount pin.
The front subframe has to be modified if cones are used. The locking mechanism for the bags in the towers of the subframes have to be peened over (ruined for conversion back to wet, by the way) for the cones to fit.
The rear subframe can be used as is for cones.
cheleker- Posts : 185
Points : 5250
Join date : 2010-06-15
Location : Seattle, Washington, USA
Re: Hydrolastic, keep repairing or change to dry cone?
![]() Red Riley Sun Oct 09, 2011 10:18 pm
Red Riley Sun Oct 09, 2011 10:18 pm
Have you done the rear arm conversion to the dry stub axles? As of now my rear shocks are attached to the pin for the helper springs with just a washer and cotter pin holding everything in place. (So it can be done in a pinch) I've got a new set of dry stub axles with the proper threaded shock mount, and an extra set of arms to experiment with, but haven't had the chance yet to try getting the old ones out. Does it take some machining to get the new dry axles to fit?
Red Riley- Admin
- Posts : 1239
Points : 6950
Join date : 2008-10-27
Age : 64
Location : Johns Island, SC, USA
Re: Hydrolastic, keep repairing or change to dry cone?
![]() cheleker Mon Oct 10, 2011 2:17 am
cheleker Mon Oct 10, 2011 2:17 am
cheleker- Posts : 185
Points : 5250
Join date : 2010-06-15
Location : Seattle, Washington, USA
Hydrolastic, keep repairing or change to dry cone?
![]() MGs Mon Oct 10, 2011 10:14 am
MGs Mon Oct 10, 2011 10:14 am
cheleker wrote:Tough call about keeping hydo on the road, but it is a shame to have to convert from the best Mini suspension ever made for a road car.
If the leak in the bag is at the hose connection to the bag, it should be repairable.
The coil springs (not my favorites) will fit in both front and rear wet subframes without modification. You can keep the better leveraged wet upper arms, but you will have to drill them out to accept the lower shock mount pin.
The front subframe has to be modified if cones are used. The locking mechanism for the bags in the towers of the subframes have to be peened over (ruined for conversion back to wet, by the way) for the cones to fit.
The rear subframe can be used as is for cones.
Thanks for the info, I don't want to change it but hydro parts are getting expensive and hard to find. The displacer was £170 plus £70 fitting, with no certainty of it working. The first unit failed within an hour. They are sending a replacement free of charge, but we will have to pay for fitting and re-pumping again. With dry systems starting at £240, if they can be fitted into the existing subframes then it will save us a lot of money in the long term
MGs- Posts : 99
Points : 5045
Join date : 2010-11-23
Hydrolastic, keep repairing or change to dry cone?
![]() MGs Mon Oct 10, 2011 3:57 pm
MGs Mon Oct 10, 2011 3:57 pm
Mini Sport quoted £298.56 inc VAT for the cones, adjusters, shocks, mounts and stub axles and said that was all
that was required.
Mini Spares quoted £1000s and said that you need both full sub-frame assemblies. However, they did say
that they had sent an old displacer off to see about getting them re-manufactured. They did say the process
will take 12-18 months and they would not be cheap.
Min-its quoted £400 for the cones, dampers, bump stops, rear radius arms etc. Said that the rear subframes
could be reused but the front subframe need modifying. They did say they thought Min e Bitz in Sheffield had
some new old stock items. Tried them, £125 for used items, the new old stock ones are sold out, but were
listed at £400 each.
MGs- Posts : 99
Points : 5045
Join date : 2010-11-23
Re: Hydrolastic, keep repairing or change to dry cone?
![]() scooperman Fri Oct 28, 2011 4:05 pm
scooperman Fri Oct 28, 2011 4:05 pm
We
I studied the old CCC article "Make Your Own Wet Suspender Pump" by The Phantom Con Rod, there is a copy
here [url=http://mk1-performance-conversions.co.uk/CCC.PDF/url]over at the Mk1PerformanceConversions website. So that explained what I needed to evacuate the system. Todd's much-quoted article over at his [url=http://members.tripod.com/austin_america/id63.html/url] ADO16 site shows how to make a DIY pump from an old grease gun, so that is what I will use for the pump. He also shows various methods of repairing leaky hoses. I have decided not to try the drilling and tapping method, I see that as a last resort, and not to try hose clamps, at least on this first attempt. Instead I will try the compression fitting adapter conversion to JIC 37 fittings. I emailed him to ask about his choice of 14mm metric adaptors, since my Elf displacer only has a 3/8" tube. He tells me the ADO16 tube is indeed 14mm.
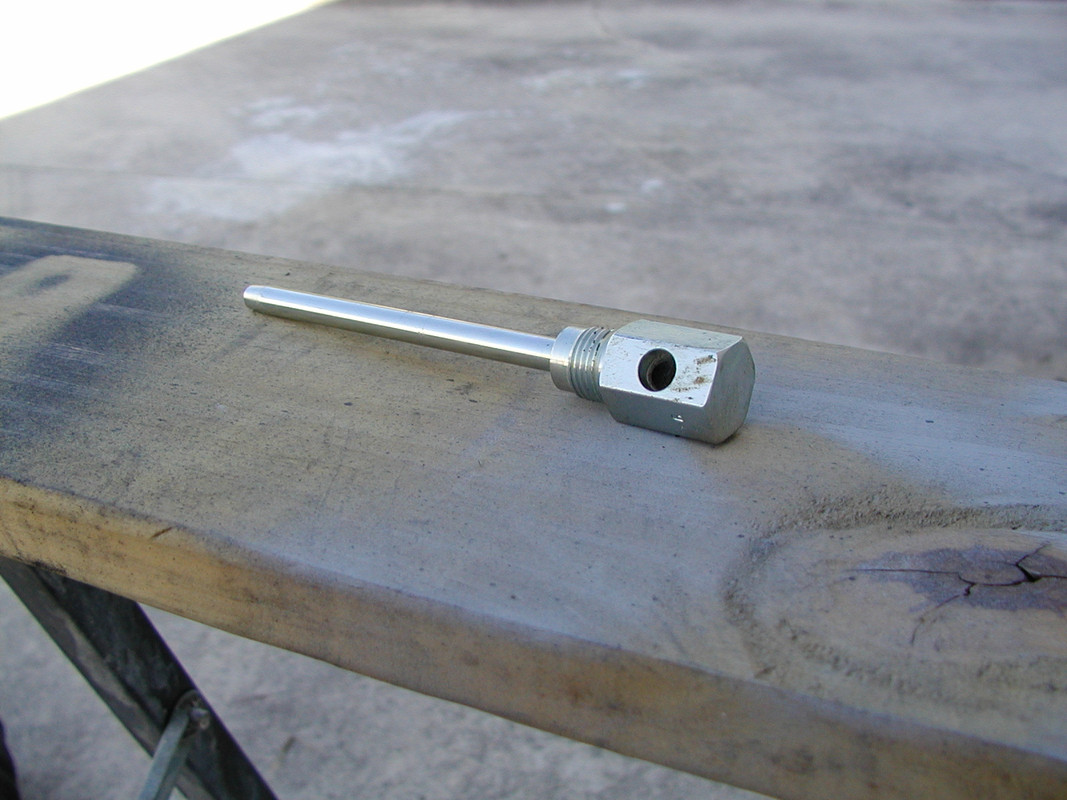
Here is a photo of the displacer with hose cut off:

The displacer tube was slightly non-circular due to the old hose having been crimped on.
The Parker 6XHBU-S adapter I used has a compression sleeve I.D. of 0.380", my displacer tube O.D. measured about 0.384". I gently burnished its surface using a sanding roll in a die grinder, trying to get a circular tube just under 0.380". I did not realize how fast this would sand down, I may have taken a couple thou too much off the first one I did. The second one was done better.
Now that the sleeve slides on the tube, fit the nut and sleeve to see how much tube protrudes. The end that protrudes was tapered for the original hose fitting, I don't want any taper inside the sleeve. If I had a flaring tool I might have tried stretching that tapered bit, but since I don't, I cut off the tapered end.

Compression fittings need the end of the tube to be cut square, so I used a small tubing cutter. Remove about 4mm of the tube. If more than about 5mm is removed, the nut will not go on far enough, in which case you then have to grind away the shoulder at the bottom of the tube.

Debur the tube end, install and tighten the fitting.

I have removed the fitting at the other end of the hose, I have to save and reuse this on the new hose because it is difficult to find new fittings, it is a 5/8"-18 SAE 30deg fitting. (Originally I assumed they were 45 degree because I can find those listed, but at the hyrdraulic supply shop they measured the angle and its very close to 30 degree).
But before I run off to get new hoses made, I need to either pressure or vacuum test the modified displacers. A pressure test needs a fixture to hold the displacer and keep the strut from moving, I think it may be easier to pull a vacuum on it and see if I have any leaks. So I probably should move on to making my vacuum tank next.
Last edited by scooperman on Thu Oct 19, 2023 4:29 pm; edited 5 times in total (Reason for editing : [2019 edits will follow...pictures that were previously on Imageshack disappeared, will restore as I find them and get them back on the web.])

scooperman- Posts : 36
Points : 5543
Join date : 2009-04-09
Location : Palm Beach Gardens, Florida USA
Re: Hydrolastic, keep repairing or change to dry cone?
![]() scooperman Wed Nov 02, 2011 4:22 pm
scooperman Wed Nov 02, 2011 4:22 pm
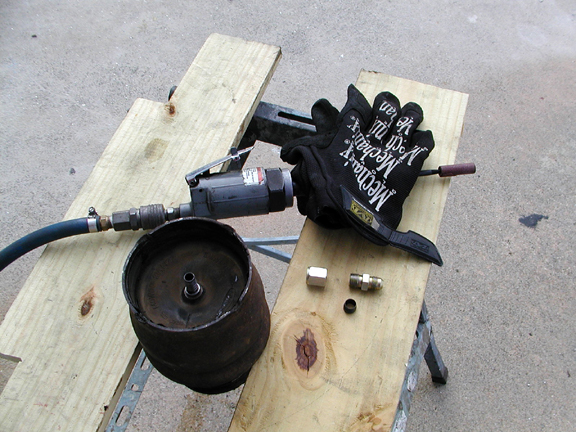
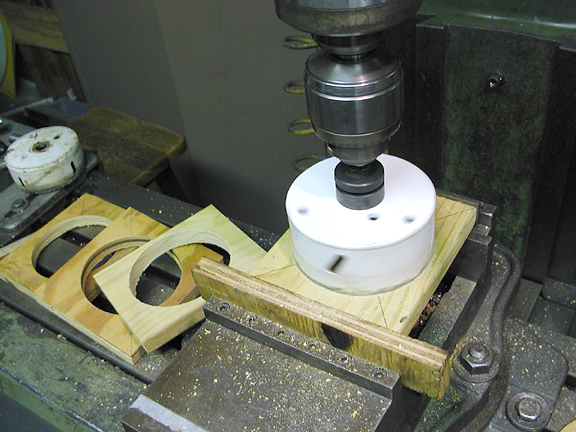
I drilled a hole in some 1/4" steel scrap and tapped it 1/8 NPT.
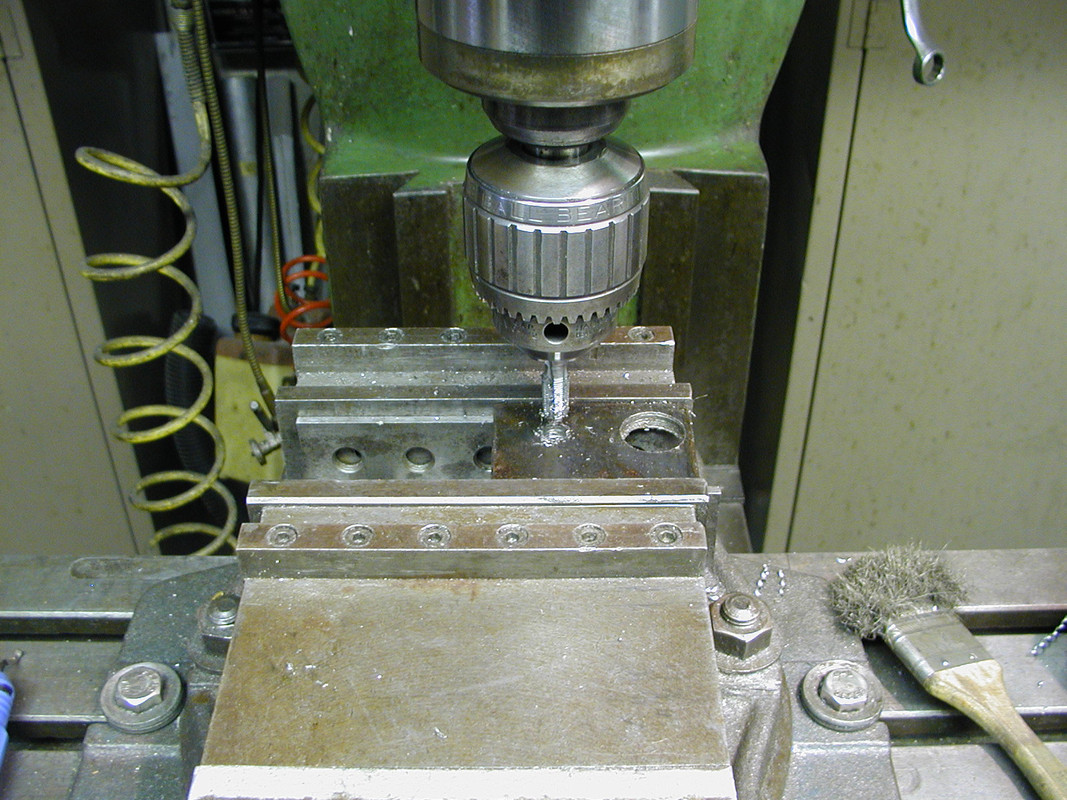
Then I used a hole saw to cut out a circular metal bung with the tapped hole in the middle.

Since the hole saw makes a messy cut, the edges are very rough. I used the tap as a mandrel to spin the bung in the lathe chuck. If you don't have a lathe, just spin it in the drill press and clean it up with a file and sandpaper.

Drill a hole in the tank, deburr it, weld on the new bung.
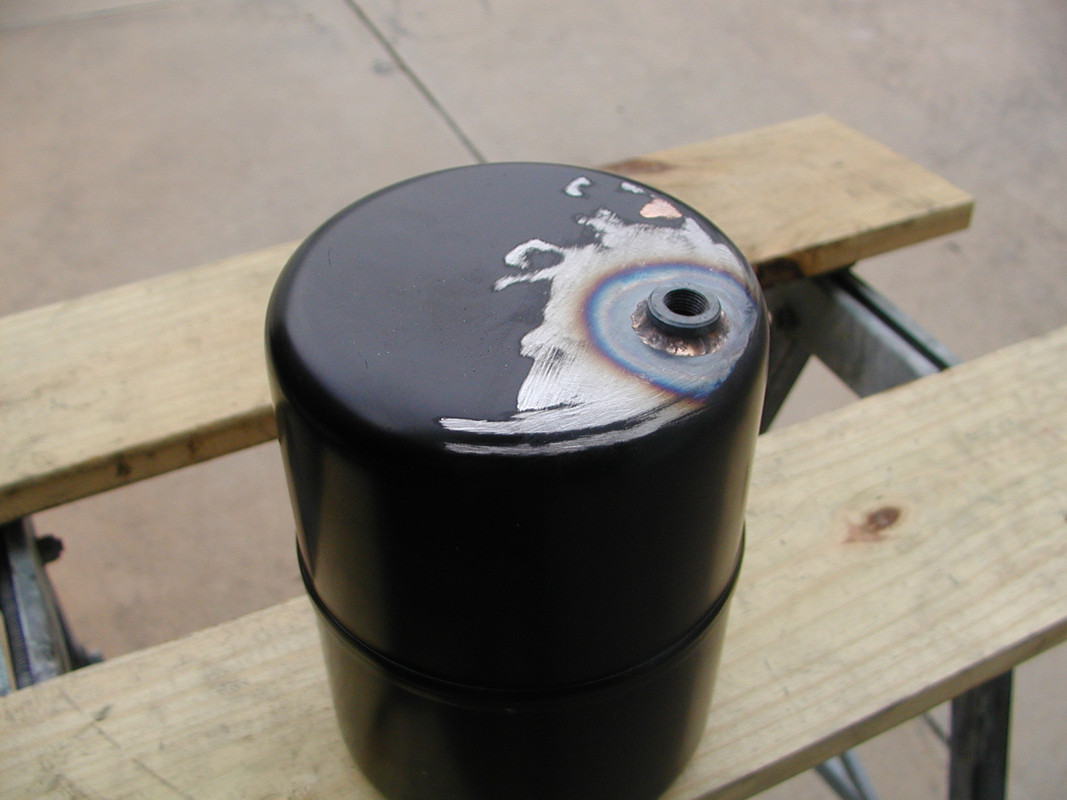
With the new pipe fitting on the bottom, the tank will no longer stand up. I cut and bent some scrap steel to make a stand which supports the tank.

The tank came with a handle-shaped mount, I used those attachments to mount the stand to the tank. Here are a couple of pics of the finished tank, with the in/out pipe on the bottom and the one-way valve and a vacuum gauge on the top.

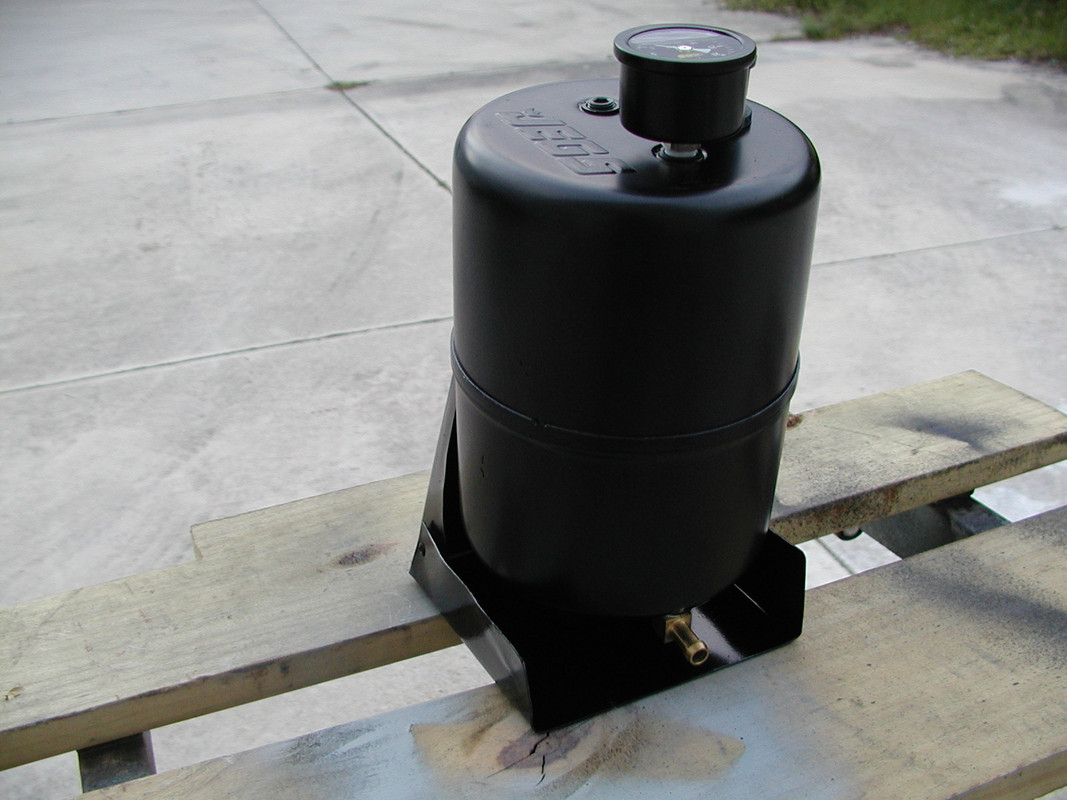
The in/out pipe will get a hose attached, at the other end is the no-loss Schrader valve for connecting to the car.

Next post: making new hoses.
Last edited by scooperman on Mon Dec 31, 2018 2:48 am; edited 3 times in total
scooperman- Posts : 36
Points : 5543
Join date : 2009-04-09
Location : Palm Beach Gardens, Florida USA
Re: Hydrolastic, keep repairing or change to dry cone?
![]() scooperman Wed Nov 02, 2011 6:01 pm
scooperman Wed Nov 02, 2011 6:01 pm
I then searched for crimp sockets to fit my old fittings, to see if I could do it myself. I can buy them, but without the special crimping equipment I was not going to be able to make up the hoses.
I am not overly concerned with originality, but I also don't want the new hoses to look horribly different from the stock hoses. I want something that will attach to the original hard pipes on the car, so that I don't have to change all of that plumbing. The AN fittings down on the displacer are hidden, so I don't care what they look like.
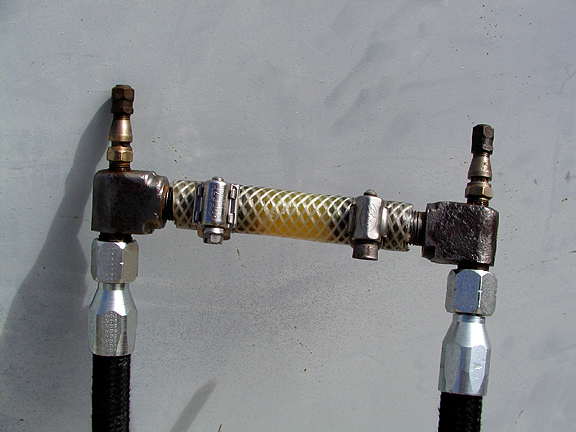
Eventually I found some reusable fittings (i.e., can be assembled with hand tooling) which are not too different-looking from the original hose ends. I found some 5/8"-18TPI straight thread fittings, but they have 45 degree taper. None of the suppliers had fittings which matched the 30 degree taper of the original fittings.
Then I found the Adaptall 9999. This a 30 degree double cone sealing seat adapter, it adapts a BSPP fitting to a JIS pipe. I called Adaptall and
asked if they could make me some 45/30 adapters, they can but I would have to purchase a large batch.
[edit: two pics of Adaptall 9999 flare adapters missing here. If I find pics I will add them, otherwise...Google them]
30/30 degree flare adapter

I decided instead to modify standard 45 degree reusable fittings to 30 degree and use the 30/30 adapter. I purchased a few of the 9999-06 adapters and some Eaton Aeroquip 401-6S fittings, which are SAE 45 degree swivels. I chucked up the 401-6S internal hose insert, which is a threaded barrel machined on the end with the 45 taper, in the lathe and recut the taper from 45 degree to 30 degree.

Then I brought the modified fittings back to the hydraulic shop where I purchased them and asked them to install them on hoses. They refused because I had modified them.
OK, fine. I got them to cut some FC350 black hose to length and to assemble the standard AN6 swivel fitting on one end of each hose. I watched how they did the assembly, then I bought an assembly mandrel for the 401-6S so that I could assemble the other ends myself. Its part number is FBM3402, made by Aeroquip. If I wanted another project (I don't) I could have made one of these tools myself, but since it wasn't too expensive and I am going to be doing more of these, it made sense to buy one.
When re-cutting the taper on the 401-6S, leave a small face edge on the O.D., this is needed for the assembly mandrel. That is where the mandrel contacts the insert and pushes on it during assembly, keeping it locked in place.
Picture of displacers, one before, one after. Note the Adaptall adapter to be inserted.
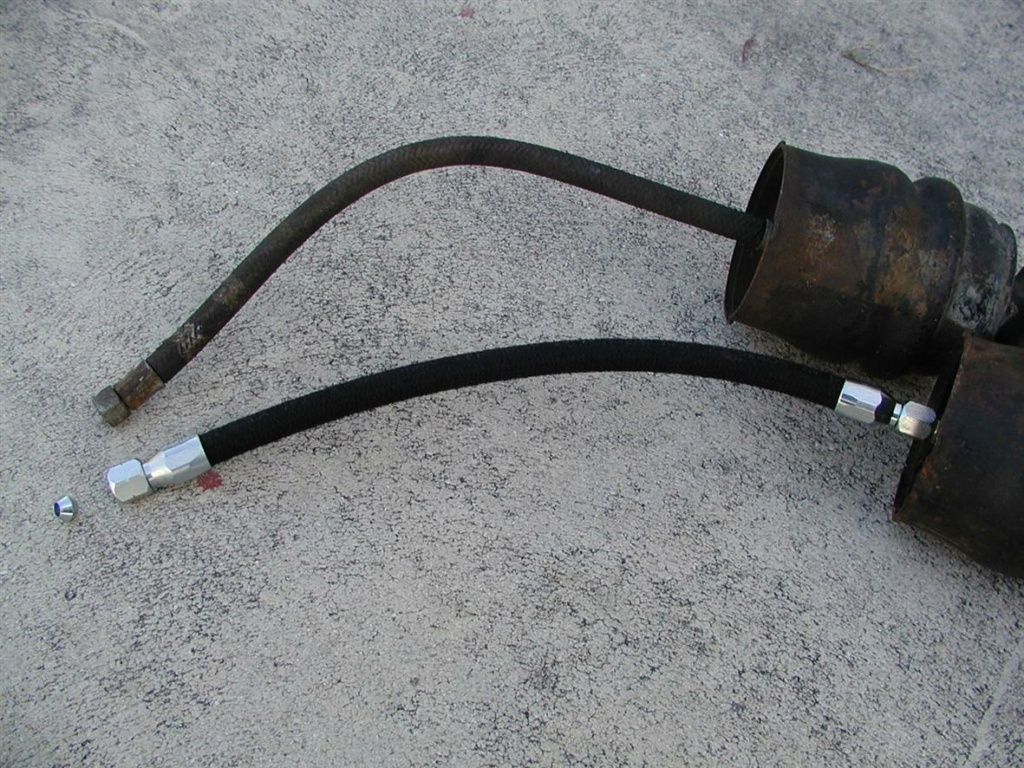
Now on to leak testing the displacers with the new hoses.
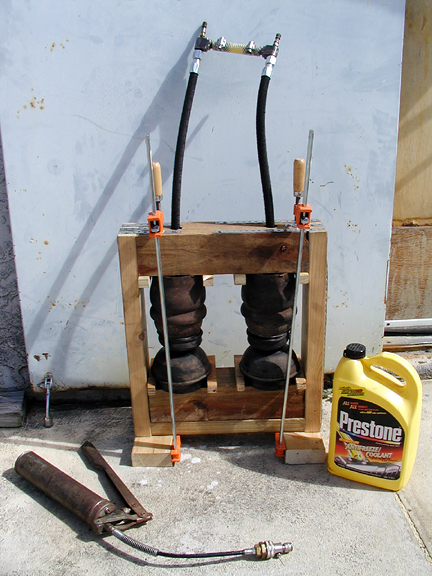
To test the hydro displacers I have to pressurize them, and this means the displacer piston needs to be constrained by an appropriate load spring. Also, I need some kind of frame/structure to hold the displacer in alignment with the load spring. Then, since I want to test both of my front displacers, the frame/structure should hold two of them, then I can connect the hoses together and test two at a time.
What is the most appropriate thing to use for a load spring? A dry-subframe Mini spring. Sure enough, I found some in my pile of junk...errrrr....rare vintage parts.
I am not sure if my frame idea will work first time, so I decided to make a prototype out of mostly wood. If it works, fine. If it breaks, I will have all the dimensions worked out and can weld up a second one in metal.
OK, less typing, more pictures...
Making locating blocks for the hydro displacers and rubber springs.
Sawing 4x4 pieces.
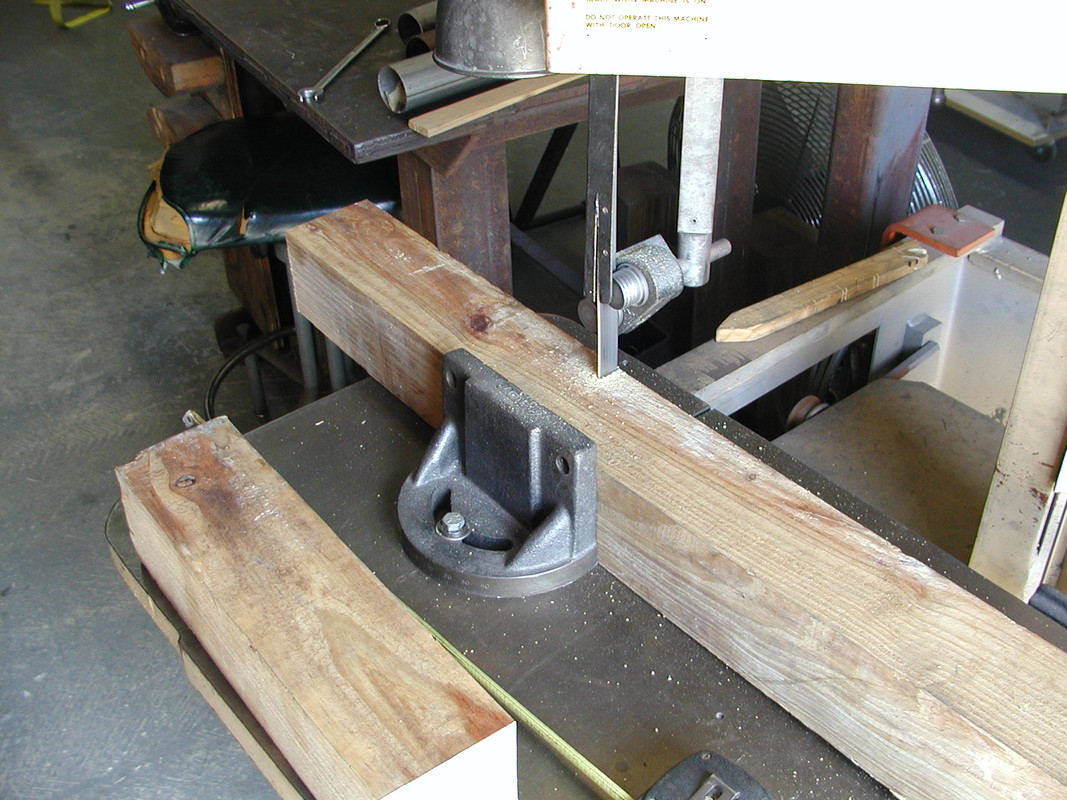
Locating blocks attached to top and bottom 4x4 pieces.

Outer frame assembled.
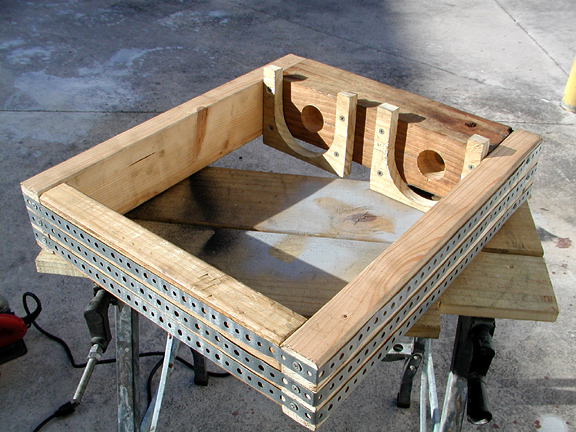
Obviously, this simple screwed-together wood frame could never withstand the force of a fully pressurized displacer, the screws would pull out of the cheap lumber. This frame is only intended to hold the components in alignment. However, the frame by itself can probably withstand a light amount of pressurization, enough for me to find any leaks, without any worries. Three layers of pipe strapping is wrapped tightly around the frame as a failsafe restraint in case I do overpressure it during a leak test.
During any high-pressure test, external clamps will be applied to resist the displacer force.
Frame shown with rubber spring platform ready to install.
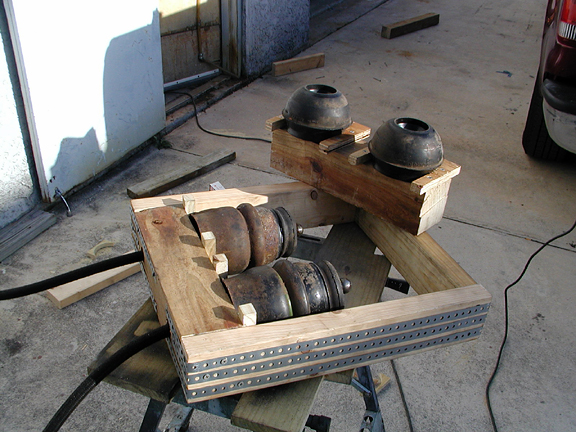
Installing the rubber spring platform.

Hydro displacer test frame, ready for first test.
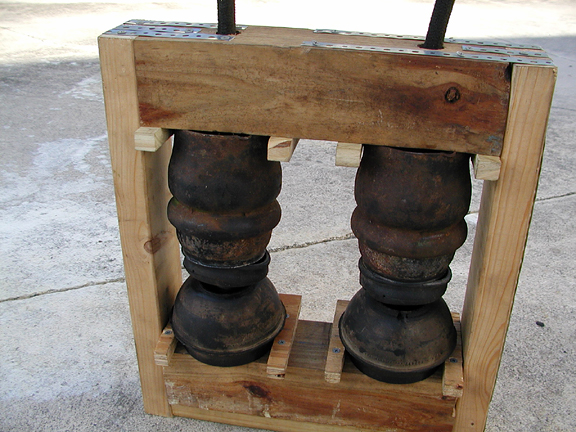
Next post: first test.
Last edited by scooperman on Tue Oct 17, 2023 3:48 pm; edited 10 times in total (Reason for editing : replacing lost Imageshack images, hose p/n typo was FC530 should be FC350)
scooperman- Posts : 36
Points : 5543
Join date : 2009-04-09
Location : Palm Beach Gardens, Florida USA
Re: Hydrolastic, keep repairing or change to dry cone?
![]() whitebuffalo Wed Nov 02, 2011 11:41 pm
whitebuffalo Wed Nov 02, 2011 11:41 pm

whitebuffalo- Posts : 159
Points : 5828
Join date : 2008-10-27
Age : 50
Location : Lancaster, California -

Re: Hydrolastic, keep repairing or change to dry cone?
![]() scooperman Thu Nov 03, 2011 8:37 pm
scooperman Thu Nov 03, 2011 8:37 pm
I placed two clamps on the frame and pressurized the lines with the grease gun pump, as described on Todd's austinamerica site.
No need to pull a vacuum on this test rig, because the Schrader valves are at the highest point. Connect the tractor tire fill valve to one of the Schrader valves and pump fluid in for a minute, then release the other Schrader valve to let the air out, keep repeating until the bubbles stop and it pushes fluid out. From that point, continued pumping expands the displacers and they squeeze the rubber cones.
I gave it a few good pumps, about 20 seconds of pumping, and then stopped, because this rig does not yet have a pressure gauge. I let it sit for 3 hours and there are no leaks.
My goal for this rig was to look for leaks on the modified displacers and I have done enough for me to have confidence that the fittings do not leak, I can move on to putting the car back together.
I am satisfied with the utility of this pressure test rig, and when time permits I will do two improvements. First, I will put a big bolt through it from top to bottom, so that I won't need the extra clamps. Second, I will make a better manifold with a pressure gauge on it, to get rid of the clamp hose, and so that I can monitor the pressure.
I will need to buy/borrow/make a vacuum pump soon, but at this point I have not spent a lot of money fixing the hydo, and I now have the tools to repair my other cars as well.
Last edited by scooperman on Mon Dec 31, 2018 3:14 am; edited 1 time in total
scooperman- Posts : 36
Points : 5543
Join date : 2009-04-09
Location : Palm Beach Gardens, Florida USA
Re: Hydrolastic, keep repairing or change to dry cone?
![]() scooperman Wed Nov 09, 2011 6:52 pm
scooperman Wed Nov 09, 2011 6:52 pm
So I drilled a drain hole in the upper rim of the front displacers.

I hoped that the repaired displacer would install easily. Alas, it was not to be. The new compression fitting and AN adapter on top of the displacer are taller than the original crimped socket. As the displacer is installed, it slides in at an angle and the hose must bend, the new hose can not bend as quickly as the original hose, so it bumps into the top of the subframe tower. Drat. Curses.
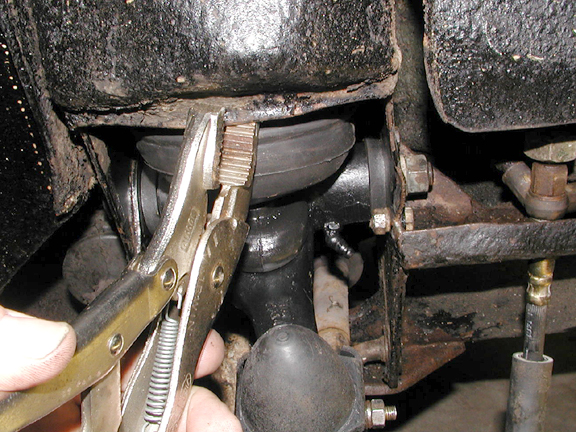
After many attempts, I noticed three points where the displacer body was bumping into the subframe, and I could see that if the displacer could just get a bit farther, it would pop in. I was not at my shop where I have a grinder and power tools, this was at home where I only have hand tools. After I got the displacer installed, I took three photos to show how and where to adjust the subframe.
First, the rear doubler plate for the upper arm is formed into a brace at the bottom, the lower bump stop is screwed to this brace structure. The corner of this brace needs to be filed down.
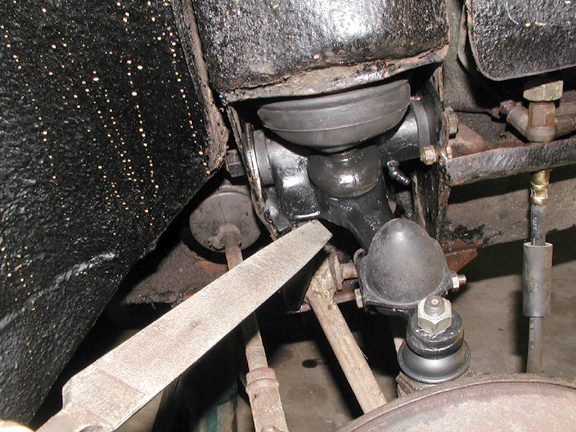
Second, one of the roundish bumps on the displacer hits the front wall of the subframe tower. Use a percussion scalpel to form a bumped-out area here.

Third, the displacer hits the upper part of the tower on the ledge where the upper arm upper bump stop hits. Pull the lower lip of the ledge out and away, I used vise-grip pliers.
With these mods, the displacer still jams and will not go in with a hand push. To give things a tiny bit more room, support the car with jackstands under the subframe and remove the two subframe tower bolts, the hose sleeve retainer plate and the plastic hose sleeve. Then while bumping on the lower part of the displacer with a gloved hand, pull on the displacer hose with the other hand. The hose pulls the displacer slightly outward and aligns it better with the hole in the subframe, and with each bump it will nudge it closer, it finally pops in.
Fit the new hoses to the old hard line fittings on the bulkhead, remembering to first install the 30/30 degree cone adapters.
After that, evacuate and refill the displacers, as described in the CCC article mentioned earlier, and then pump up the system.
OK, that's it. Drove the car today, no leaks.
The original poster asked if it made sense to keep repairing the Hydrolastic or if he should switch to dry. In my posts here I have tried to demonstrate that
if you can do some of the work yourself, and if you can borrow a vacuum tank and a pump, then you can repair your Hydrolastic car and your parts cost should be low.
My parts cost to mod/repair one displacer and make one new hose came to $35.24, even though the hose and hose fittings were purchased from a hydraulic supplier at list price. I found the compression fittings on Ebay so I got those much cheaper than list price. I intend to keep eyes open for discount sources of these parts on the web, and stock up on enough spares for my other cars.
If your hydraulic supplier is willing to assemble the hoses after you have modified the 45 degree fitting to 30 degree, then you will not need to purchase the assembly mandrel. Even if they refuse, they will cut the hose to length and assemble the other standard fitting on your new hose. The assembly mandrel should cost about $35 bucks.
Getting that 45 degree fitting cut to 30 degree seems to be the only specialist operation, but anyone with a lathe can do it.
If you do choose to build your own evacuation/refill tank, the CCC article suggests getting one from a junkyard. I purchased a new tank, a new vacuum gauge, and a new no-loss Schrader valve, plus some hose fittings and hose and whatnot. I made my own hose bung to weld to the tank. All done I spent about $60 on that tank, and about $40 for that fancy valve. Again, this may be something you can find at a discount.
I borrowed the vacuum pump, if I couldn't borrow one I would rent one, buy a used one, or figure out how to make one. I bet there are websites explaining how to make one. My fill pump is an old grease gun, I consider this to have been fully depreciated to $0 value when I converted it to Hydrolastic use. The NAPA tire fill valve and adapter were purchased many years ago, I haven't researched modern pricing for these. I figure I could scrounge up an old grease gun and turn it into a pump for under $30.
Because this was my first Hydrolastic repair, I did not want to find out that I had leaks after installing things back in the car. That is why I made a pressure test rig. Apparently this was not necessary, the new fittings and hoses worked perfectly.
Hope something here is helpful to you.
Last edited by scooperman on Mon Dec 31, 2018 3:20 am; edited 1 time in total (Reason for editing : because people keep asking me to put the pictures back)
scooperman- Posts : 36
Points : 5543
Join date : 2009-04-09
Location : Palm Beach Gardens, Florida USA
Re: Hydrolastic, keep repairing or change to dry cone?
![]() Red Riley Wed Nov 09, 2011 7:30 pm
Red Riley Wed Nov 09, 2011 7:30 pm
Red Riley- Admin
- Posts : 1239
Points : 6950
Join date : 2008-10-27
Age : 64
Location : Johns Island, SC, USA
Re: Hydrolastic, keep repairing or change to dry cone?
![]() cheleker Thu Nov 10, 2011 6:35 pm
cheleker Thu Nov 10, 2011 6:35 pm
cheleker- Posts : 185
Points : 5250
Join date : 2010-06-15
Location : Seattle, Washington, USA
Re: Hydrolastic, keep repairing or change to dry cone?
![]() scooperman Thu Nov 10, 2011 8:20 pm
scooperman Thu Nov 10, 2011 8:20 pm
cheleker wrote:Regarding fitting issues with the "remanufactured" displacer, couldn't you have removed the upper arm to get clearance?
hi Chuck. I guess I didn't explain that part very well. The upper arm must be taken out in order to remove a displacer, so yes the upper arm was already out of the way when I began fitting the repaired unit.
Remember, this was a bit of an experiment, I was trying something I had not tried before. When I ran into interference, I had to try different things to make it fit. When I got the first one to fit, I made sure that all the remaining bits (including the upper arm) would assemble without problems. I then followed those same steps on the other side of the car, because I wanted to prove that I had a reliable process/procedure, which I could then describe on this blog and show in pictures.
I didn't see the point of taking pictures of it half-assembled, maybe I should have done that. So my pictures above show the displacer fully installed and the upper arm is in place in those pictures.
scooperman- Posts : 36
Points : 5543
Join date : 2009-04-09
Location : Palm Beach Gardens, Florida USA
Re: Hydrolastic, keep repairing or change to dry cone?
![]() Red Riley Mon Dec 31, 2018 3:51 pm
Red Riley Mon Dec 31, 2018 3:51 pm
scooperman wrote:Hydrolastic repair
Still good info. Thanks for refreshing the image links!
Red Riley- Admin
- Posts : 1239
Points : 6950
Join date : 2008-10-27
Age : 64
Location : Johns Island, SC, USA
Re: Hydrolastic, keep repairing or change to dry cone?
![]() scooperman Wed Apr 12, 2023 8:23 pm
scooperman Wed Apr 12, 2023 8:23 pm
scooperman- Posts : 36
Points : 5543
Join date : 2009-04-09
Location : Palm Beach Gardens, Florida USA
update; repair done in 2011 still holding
![]() scooperman Thu Oct 19, 2023 4:51 pm
scooperman Thu Oct 19, 2023 4:51 pm
scooperman- Posts : 36
Points : 5543
Join date : 2009-04-09
Location : Palm Beach Gardens, Florida USA
Red Riley likes this post
» Hydrolastic
» Hydrolastic
» Hydrolastic pipe routing
» Hydrolastic advice please.
|
|
|